Every Door Direct Mail (EDDM)
Do it yourself guide
A quick step guide for businesses who are looking to order postcards and send out their own Every Door Direct Mail campaigns.
Introduction
The following step by step guide will show you how to process your own Every Door Direct Mail (EDDM) campaign. The beautiful thing about processing your own EDDM mailing is that you have the versatility to order your printing in bulk in order to save money, while also splitting up your mailings over several days / weeks if you so choose. Let’s say you want to order 10,000 postcards to save a bunch on printing (there are huge price breaks), but you don’t want to fork over postage for 10,000 pieces all at once. With EDDM Retail, you can choose to send out your mailing in spurts. Some clients will order Postcards in bulk but only send out a few thousand a week over the span of several weeks. We always recommend sending to the same home at least three times, typically every 2-3 weeks. In this case, if you don’t plan to change the mail piece, it would be recommended to order the full three campaigns worth up front to drastically lower the per piece print cost of the postcards.
There are two options when doing EDDM. You can have us print and mail the pieces for you, in which case you would have to mail all the pieces at once, or you can order the EDDM qualifying pieces and process the mailings yourself. Below, we will explain in detail, how to process your Every Door Direct Mail campaign yourself.

Step 1: Create a mailpiece that is “EDDM Eligible”
For a piece to be eligible for Every Door Direct Mail, there are certain guidelines that must be followed. If you contact the USPS, or even some other companies, they will be very confusing with the information that they give regarding what size, shape, and weight your piece needs to be. This is annoying when we encounter this, so we are very straight to the point. You have to send out what the USPS considers to be a “Flat”. In other words, your piece must be large. Here are the standard products that qualify for EDDM.
Some EDDM qualifying pieces:
- 6.5 x 8 Postcards
- 6.5 x 9 Postcards
- 8.5 x 7 Postcards
- 8.5 x 11 Flyers / Postcards
- 9 x 12 Postcards
- 4.25 x 12 Postcards
- 8.5 x 11 Brochures
Can you do other sizes? Sure. Let us know if you have a custom size in mind and we will let you know if it will qualify for Every Door Direct Mail.
Need a design?
-
Request a design
Do you have an awesome idea and want us to bring it to life?
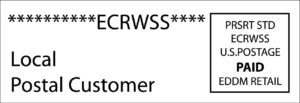
Step 2: Make sure your mail piece has the proper EDDM Indicia
The only other thing required of your mailpiece other than the size is that you have the proper EDDM indicia on either the front or the back. You will want this to be either on the top right or bottom right of the piece. It is recommended to keep this entire graphic 1″ x 3″ and on a white background if possible, so that the USPS doesn’t give you any trouble. Check out these sample images of proper EDDM retail indicia. You can download a copy of the indicia below.
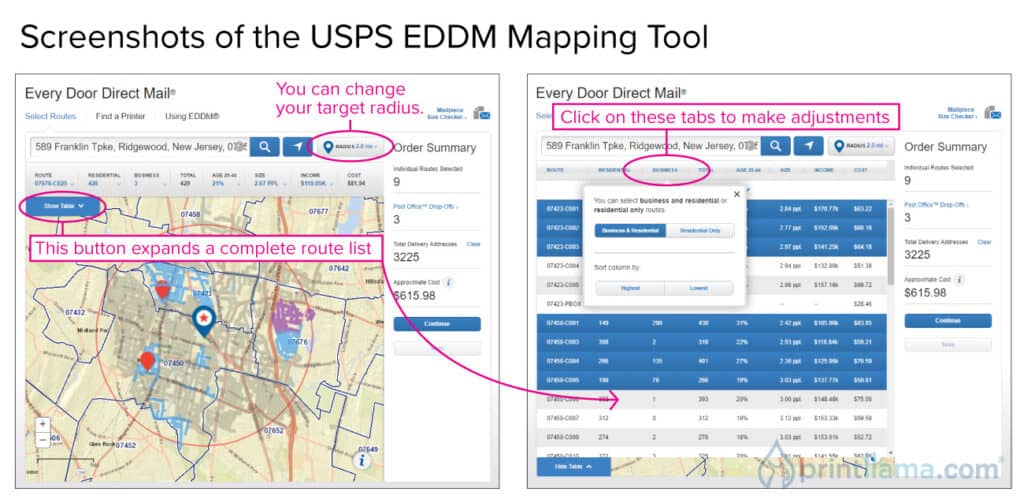
Step 3: Select your routes
With EDDM, you must target entire carrier routes to mail to. Every Zip code is broken up into sections called Carrier Routes. Each mail carrier will be responsible for delivering to their assigned routes. Most carrier routes range between 250-500 “stops”. These stops will include Residential and Business stops. With EDDM, you must target either ALL Residential and Business stops or JUST Residential. Currently there is no way to only target businesses (we wish). Use the USPS’ EDDM mapping tool (linked below) to select your carrier routes. The tool allows you to hover over routes and see demographics. You can also adjust and filter routes based on the age of residents, average household income, household size, etc.
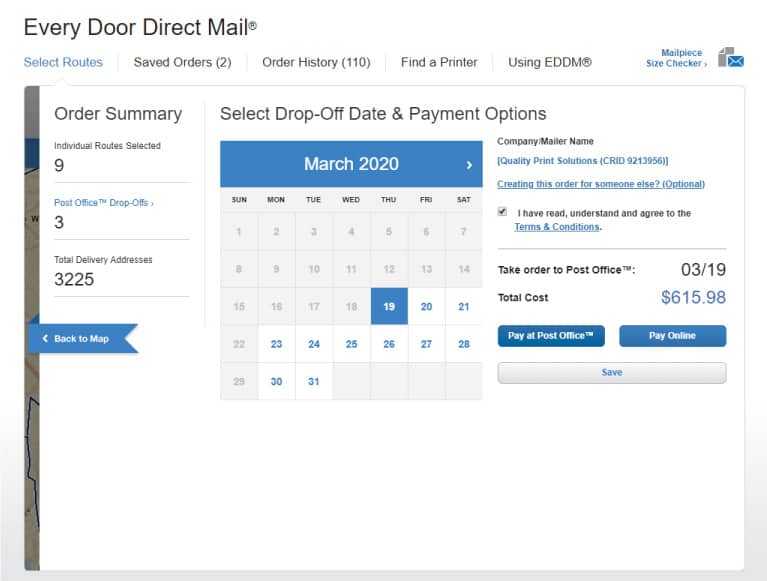
Step 4: Choose your drop off date
After you select your Carrier Routes and when you are checking out, you will be asked for your USPS drop off date. This is the date that you plan to bring the pieces to the post office for delivery. It is important to note that Every Door Direct Mail is considered (Standard Mail). Standard mail, opposed to First Class, can take anywhere from 1-14 days to be delivered to residents. While 14 days is highly unlikely and rarely happens, the USPS reserve that right. From our experience, most Post Offices deliver EDDM within 2-3 business days. If you have expiration dates on your mail piece, make sure to consider how long the piece may take to get to residents / businesses.
Step 5: Print your USPS paperwork
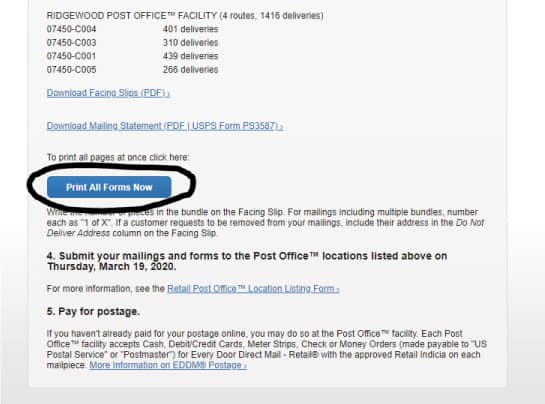
After you select your drop off date and you checkout, scroll down the “Thank you” page and click on the button that says, “Print All Forms”. This is all the paperwork you will need for your mailing.
Here is what is included in your paperwork package.
1. Facing Slips: There will be a PDF with 1 facing slip for each Carrier route you are targeting
2. Mailing Statement: This is a two-page document. The first page is an overview of the mailing and the costs. You will need to bring this with you when you drop off your mailing. Your signature will be required on this sheet. The 2nd page is just an overview of all the carrier routes you are hitting.
3. Post office locations and drop information: This sheet is your friend. It tells you what routes get dropped off where. If you are targeting only one zip code, then you will see only one delivery address and it will list the address and the carrier routes you are hitting. If you are hitting multiple zip codes or a large town with multiple post offices, the drop off locations will be broken down on this sheet. See example below.
Step 6: Prepare your mailing bundles
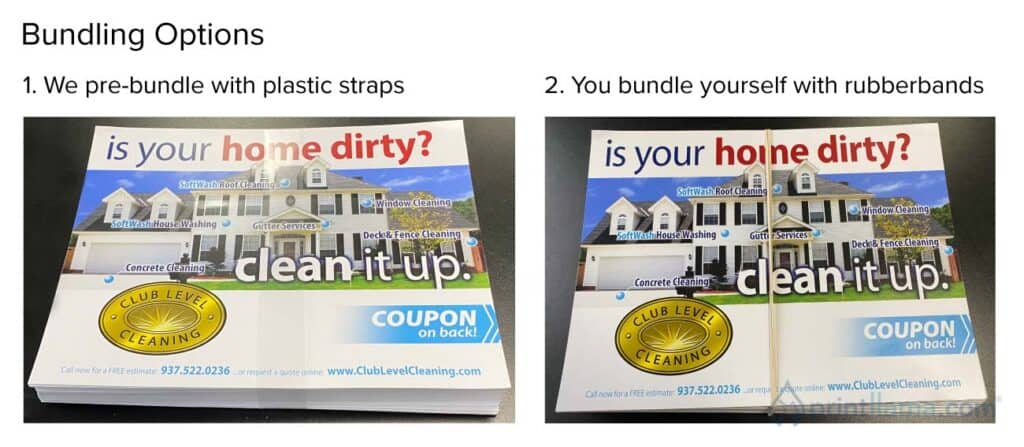
The USPS requires that your mail pieces are bundled in stacks of 100 before being dropped off to the Post Office. This can be done with rubber bands or plastic straps. When you order your Postcards or Brochures, you can pay a small fee for us to bundle your pieces for you. We explain to customers that if you are ordering 5,000 pieces or less, it actually doesn’t take much time to bundle the pieces yourself. But if you are ordering 10,000 pieces or more, or you simply don’t want to deal with the hassle, our low cost service is the way to go. Let us do the annoying work. This will save you time and money.
Step 7: Filling Out Facing Slips and Processing Forms
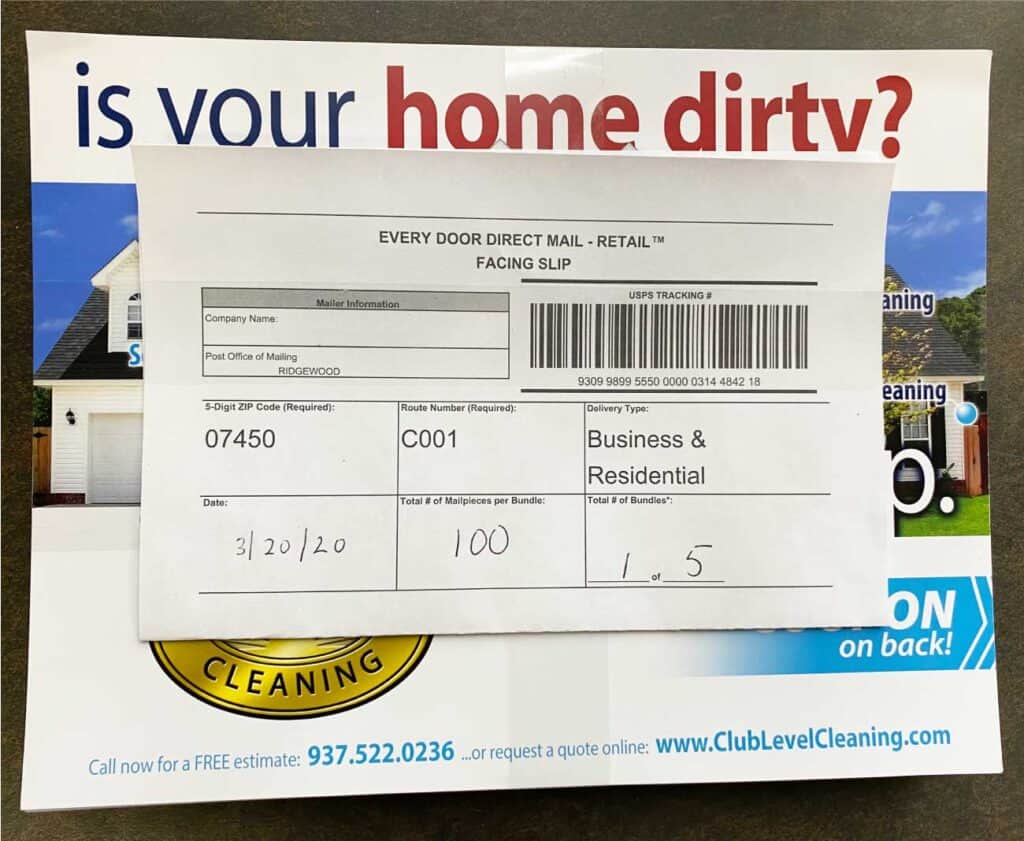
Facing slips and EDDM processing forms tell the Postal Service™ how to process and deliver your order. For every Carrier Route you are targeting, you must include the proper number of bundles, equipped with proper facing slips. Below are some sample images of how facing slips are setup. For example, if you are targeting route 07450-C001 and there are 478 stops on that route, you would need 4 bundles of 100 and 1 bundle of 78. Each of those bundles would need a facing slip filled out like the image below. This must be done for every route you are targeting.

Step 8: Pay For Postage
You can pay for your postage online via credit card when you “checkout” your mailing and select your drop date, or you can give the USPS a check when you drop off your mailing.

Step 9: Drop off your mailing
The hard work is done. And it wasn’t so bad, right? Now you just drop off your post cards at the Post Office. IMPORTANT! You MUST drop off the pieces to the post office in the zip code which you are targeting. If you are hitting multiple zip codes, you will need to drop off your pieces to separate Post Offices. The “Post Office Locations and Drop Information” form you printed will give you a breakdown of all the drop off locations.
If you need help with design or would like a template to build on, we’ve got you covered. Give us a call or shoot us an email and we would be glad to help you. 888-679-7237 • info@qpsnj.com
Need a helping hand?
If you require a more in-depth walkthrough, design assistance, a template or specific indicia, we're here to help.


